

Would you like to utilize the full potential of your ColorGATE software? Then start by setting up your printer correctly.
In this blog article, you will learn what steps you need to take to do this. We offer you an introduction to the following topics:
- Creating a printer
- Importing a MIM combination
- Selecting the printer port
- Setting paths
- Setting up hotfolders
- Advanced settings for job management
- Saving a printer
- Job-specific printer settings
You can find detailed information in our online help, which you can call up at any time directly in the software by pressing F1, and in our manual, which you can download in the Download Area (login required) on our support site. You can also use the tooltips provided in our software by moving the mouse pointer over a software element.
Notes for a Smooth Printer Setup
To set up your printer smoothly, please note the following:
- Name the printer before purchasing the software: Provide the details (the manufacturer’s name and model of your printer) when ordering the ColorGATE software.
- Set up the network: Make sure that the network is set up on your computer, as it is required for the printer setup. If you have not already done so, set up your network first. You can find out how to proceed and which network and print services are required in the section Setting up the network in our manual.
- Install certain modules: Some devices require additional software to be installed. You can find this on our Support Site in the Download Area (login required) > Software under the category Printer-Related.
How to Set Up Your Printer Step by Step
In this section, we will explain the steps you need to take for optimal printer setup.
How to Create a New Printer
To create a new printer in our software, proceed as follows:
- Click Printer > New….
- In the assistant Chose Printer select the Manufacturer (1) and the model of the Printer (2).
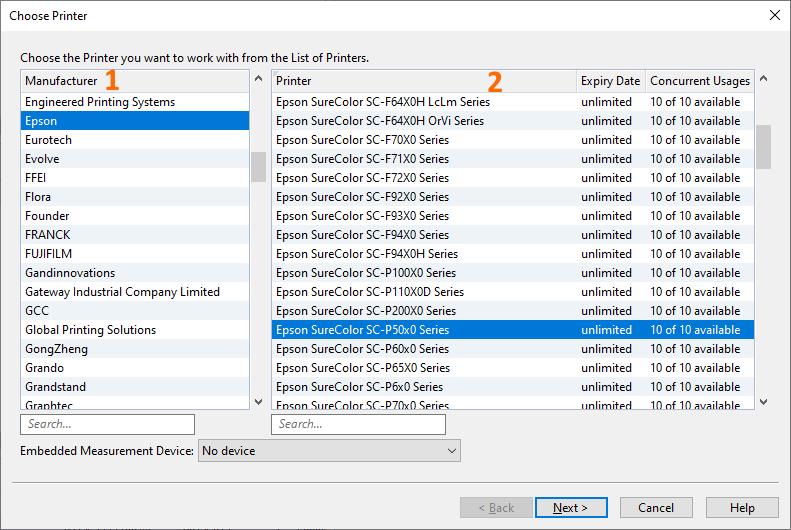
- For some printers, such as Epson SureColor SC-P50x0 Series, you can select an Embedded Measurement Device from a dropdown list. This is the default measuring device and will be selected for every measurement process. You can change this setting at any time.

- Click Next….
How to Import a MIM Combination
In the next dialog Import MIM you will see two buttons: Import MIM… and MIM Download Area.
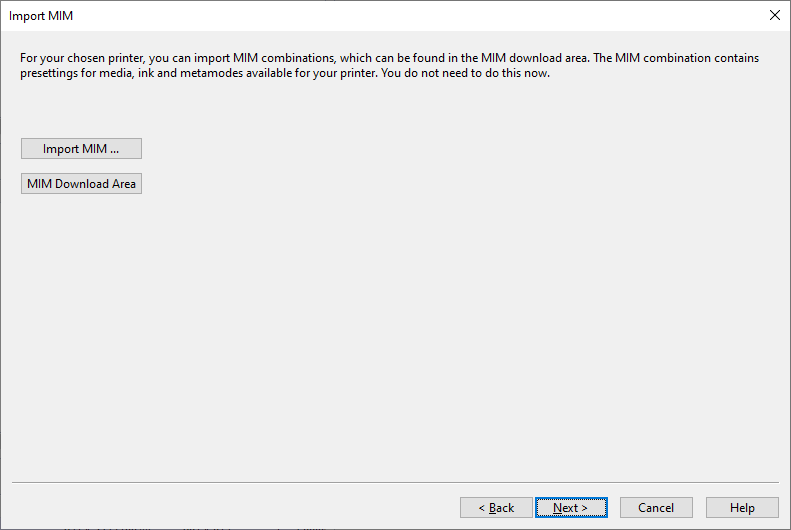
- If you have already downloaded a MIM combination, click the Import MIM… button and select the MIM file stored on your computer.
- If you have not downloaded a MIM combination yet, click on the MIM Download Area button. This button will take you directly to the Download Area > MIM Packages and Profile Targets on our support site (login required). Select the filter MIM-Packages (Profiles and Linearizations) to quickly find the desired file. For more information about MIM combinations, refer to the blog article at mim-combinations-ensure-optimal-interaction-between-printer-and-software and to our online help.
- If you want to add a MIM combination later and continue setting up your printer, click Next….
How to Select the Printer Port
- In the next dialog Printer Port, choose the type of port your printer uses. The port type depends on the model of your printer. For more details about printer ports, refer to our online help section Selecting Printer Port.
Note: If you change the port later, you will need to close the program and reopen it for the change to take effect. - Click Next to proceed with further printer settings.
How to Set the Paths for the New Printer
- In the dialog Paths you will set the storage location for the printer definition and an archive folder for your print job data (the data will be stored in this archive folder when a job is ripped or loaded in a hotfolder). Additionally, you will determine the path for the first hotfolder, which is applied to all new jobs by default. We recommend using the default paths. If you need to change the paths for production reasons, click on ….
Note: The path for the Printer Definition cannot be changed afterwards once the assistant has been closed.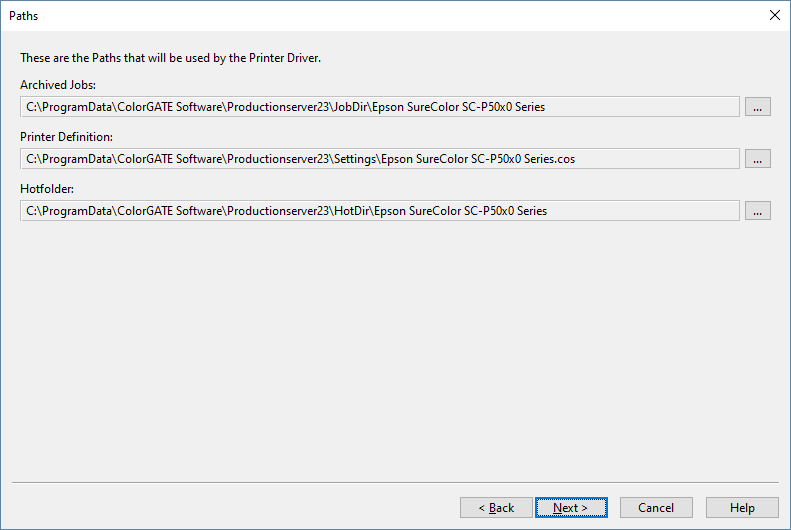
- Click Next to proceed with further printer settings.
How to Set Up Additional Hotfolder
- In the next dialog Hotfolder you will see your default hotfolder. You have the option to create additional hotfolders using the Add button. You can modify the hotfolder settings using the corresponding button.
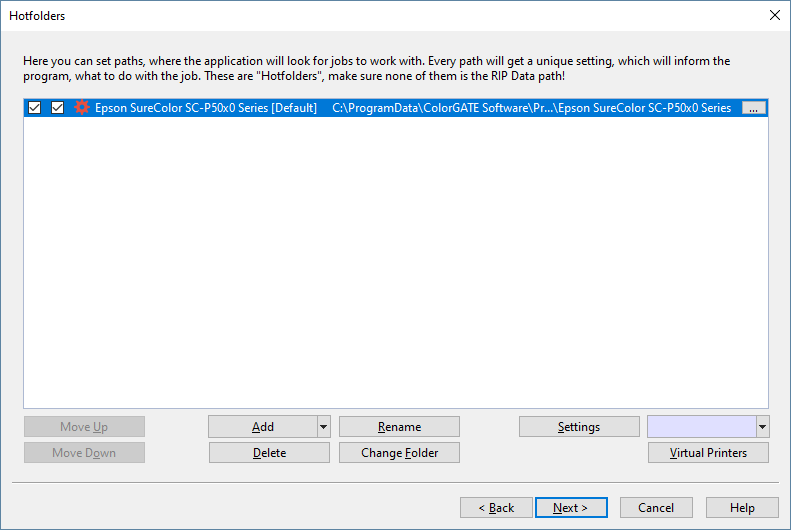
The number of available hotfolders depends on the license. It is possible to acquire additional hotfolders. For more information about the possible printer settings for a hotfolder, please refer to our online help in the section Setting up Hotfolders. - Click Next… if you want to keep the settings in the hotfolder unchanged, or if you want to change them later.
How to Make Advanced Settings for Job Management
- In the next dialog Advanced Settings, you can specify how to automatically delete your jobs in the job queue (e.g., Delete printed jobs after x days) and what should happen to existing job backups (e.g., Overwrite existing jobs).
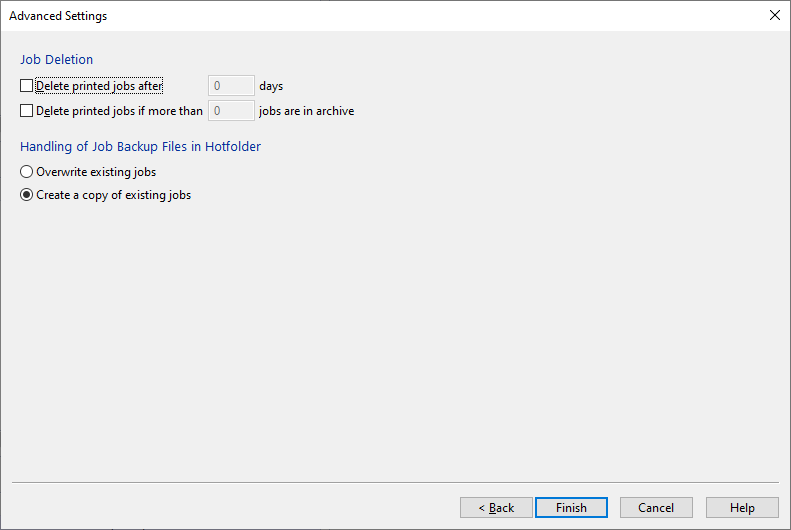
For more details on these options, refer to our online help in the section Advanced Job Management Settings. - Click Finish. The new printer will be placed by default in the directory C:\ProgramData\ColorGATE Software\Productionserver23\Settings under the printer’s name. You will see the new printer as a new tab in the Printer definitions area.
If you want to modify the settings of your configured printer, click on Printer > Properties….
How to Save a Printer
To save a new printer in a location other than the default one, such as an external hard drive, click on Printer > Save As…. If you make changes to your printer configuration later, click on Printer > Save to save them.
How to Define Job-Specific Printer Settings
You also have the option to make job-specific printer settings. To do this, double-click on your job and switch to the tab Printer. You can learn about the printer settings you can make for your job in our online help in the section Define printer setup.
If you have further questions about setting up printers or if you would like some advice, please feel free to contact us at contact@colorgate.com.