Would you like to be sure before printing that your motif will be printed exactly as you want and have set in the software? ColorGATE offers you various preview modes (e.g., document preview, with and without special colors or cut paths, channel preview, media preview and printer output), depending on which aspects of the preview are important to you.
In addition, the media preview (in the preview window) and the advanced preview (the large preview window) have been fundamentally improved in V24. You can now display all additionally printed elements that the software prints with a job. How this works is explained in this blog post. You find the following topics here:
- What are additionally printed elements in ColorGATE?
- General information about the media preview and the advanced preview
- What is new in the preview as of V24?
- What are the benefits of using the preview?
What Are Additionally Printed Elements in ColorGATE?
Additionally printed elements are all elements that are not part of the motif but are printed by our software, e.g., control wedges, job info text / QR codes, confidence strips and all types of marks (cutting marks, tiling marks, registration marks, Fotoba marks etc.). Detailed information about the individual elements can be found in the online help or in the manual. You can find the manual in the Download Area on our Support Site (login required).
General Information About the Media Preview and the Advanced Preview
To display the preview of a job, you must activate the option Preview calculation. You can find it under Job > Settings… (or double-click on the job) > Workflow tab.
The Preview Mode “Media Preview”
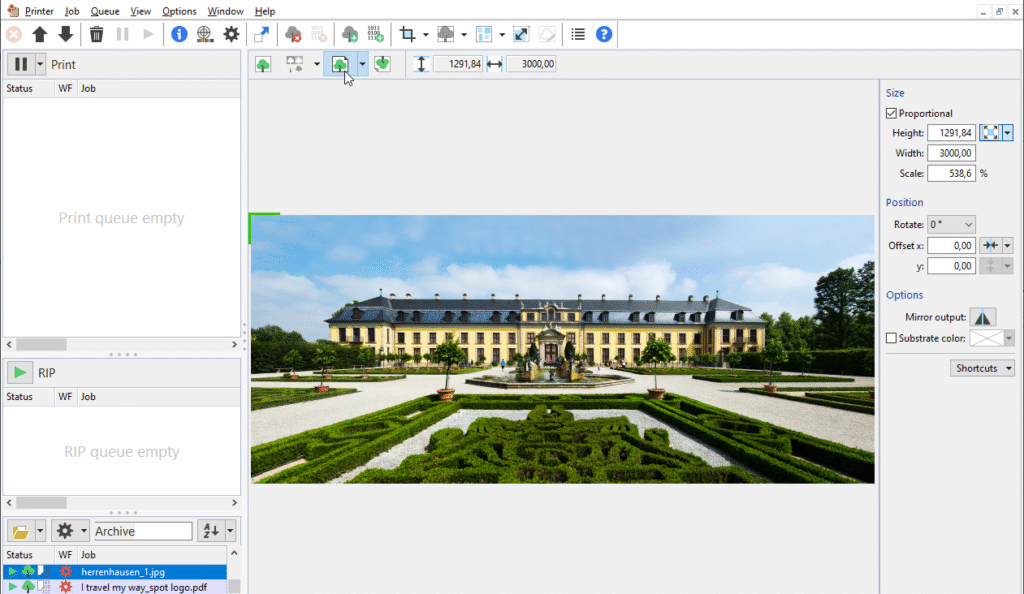
The media preview shows the print job on the medium. To display the media preview, click the Media Preview icon above the preview window. With certain printer drivers and media formats, such as RICOH Hat Platen, the plate outline is displayed in the preview. This makes it easier to place the job correctly on the medium. On the right-hand side are the job settings for size, position and other options. These are shown if you have selected the option Job placement panel under the small arrow next to the media preview icon.

The Advanced Preview
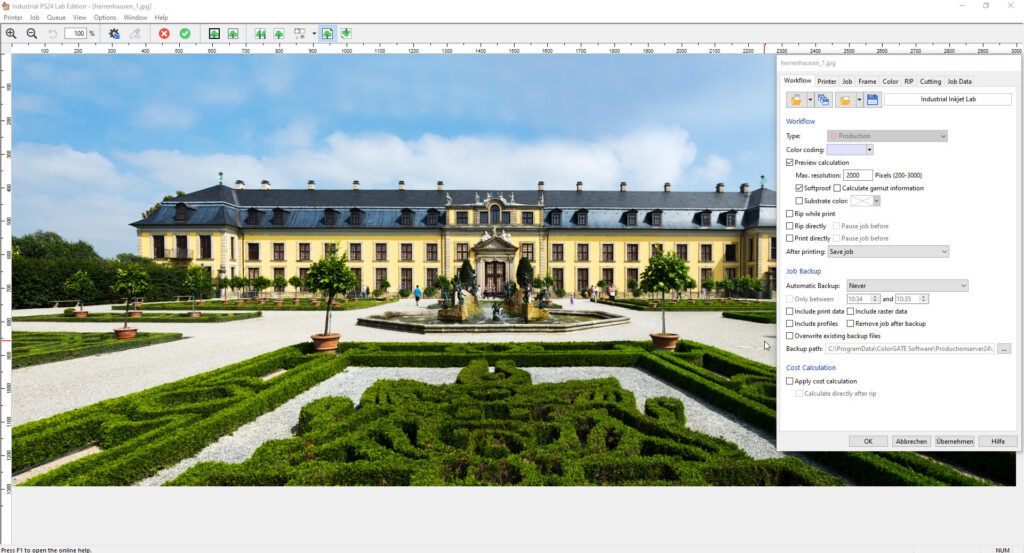
If you double-click on the preview window, the advanced preview opens in the same preview mode that you selected previously. This means that if you were previously in the media preview and open the advanced preview, you are still in the media preview. If you change the preview mode to printer output, for example, and close the advanced preview, you will remain in printer output mode in the preview window.
The advanced preview also allows you to view and change job settings. In addition, you can enlarge or reduce the size of the display and display the color composition of the image. Detailed information about the advanced preview can be found in the online help or in the manual in the Download Area of our Support Site (login required).
What Is New in The Preview as of V24?
In version 24, the media preview and the advanced preview have been completely revised and optimized. The following new features are available from version 24:
In The Media Preview
- All additionally printed elements such as control wedges, job info text / QR codes, confidence strips and all types of marks (cut marks, tiling marks, registration marks, Fotoba marks etc.) are displayed together with the print motif in the media preview.
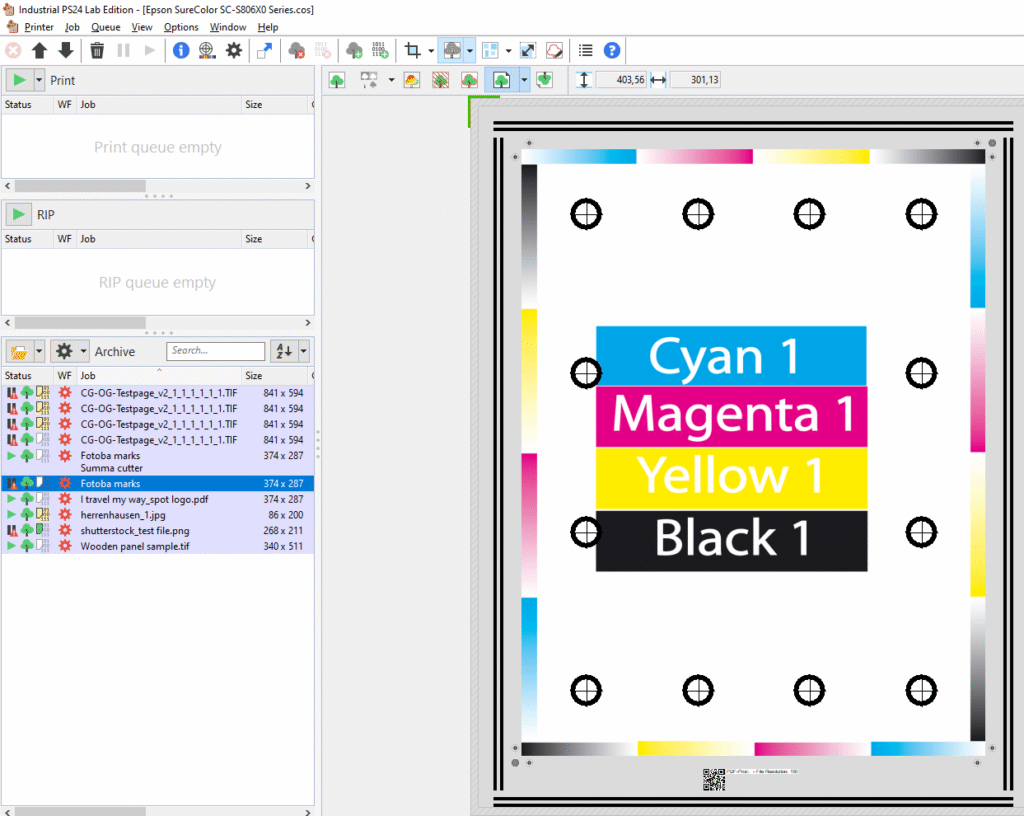
- Unprintable margins are displayed. This option is activated by default if your printer has a limitation of the print area. You can recognize the non-printable margins by the shaded area around the design.

- Container jobs are displayed as single jobs, so that all additionally printed elements can also be displayed for containers.
- The display of multiple page jobs in the media preview has been optimized: The individual pages are displayed with spaces and with page numbers.
- Optimized preview performance: It is now possible to work continuously with the program while loading the media preview for very large files.
- Two selected jobs can be displayed simultaneously in the preview. You see the names of the jobs in the preview toolbar. This is very helpful for comparing two jobs with each other, e.g., for soft proof.

In The Advanced Preview
- The additionally printed elements mentioned above are also displayed in the advanced preview, when opened in the media preview mode.
- Improved zoom function: Zooming in and out in the advanced preview takes place in several individual steps. You can zoom in and out of the job preview either via the + /— buttons in the toolbar or via the Windows function (CTRL key + mouse wheel).
- Multi-page PDF: If you have loaded a multipage PDF file, you can switch between the different pages. Use either the text selection box or the forward and backward arrows in the toolbar for navigation.

- Multi-page jobs can be displayed in the advanced preview. The individual pages are displayed with spaces but without page numbers.
Special Features in the Preview of Additionally Printed Elements
- Synchronization marks: If you activate the Enable cutting option in the job settings > Cutting tab, the synchronization marks are displayed in the preview window.
Note: The synchronization marks are always displayed in black. The background color of the synchronization marks is not displayed. - Cut marks are shown in black color. Other colors of the cut marks are only displayed if the active profile does not contain any light channels, or if the color is specified as Lab.
- Fotoba marks, tiling marks, and confidence strips in jobs and containers are always displayed in black color, even if a different color is set.
- Control wedges are always displayed in black color, even if a different color is set. You cannot move the control wedges by drag and drop in the preview window.
- Info text and QR code can be displayed in different colors.
Why You Should Use Our New Preview
The optimized preview offers you many benefits that can significantly simplify your print workflow:
- Error reduction and cost savings through precise and early print previews: With a detailed print preview, you can check whether your motif, including all additionally printed elements, is displayed correctly before the first test print. In this way, potential errors can be early identified and rectified. It is particularly helpful to check the exact position and configuration of cut marks in the preview. This prevents misprints and saves costs that could arise due to waste.
- Correct placement of the job on the medium: The preview of the medium outline makes it easy to place the job correctly on the medium.
- Quick access to the job settings: In the media preview, you have direct access to the job settings for size, position and other options. This allows you to check changes immediately in the preview.
We hope you enjoy our optimized preview. If you have any questions, please contact contact@colorgate.com.

