

You have a support case, have already created a web ticket in the ColorGATE web support and have now been asked by our Professional Services team to create a support info file (SIF)? In this blog article, you will learn what a support info file actually is, how it helps to solve your support case quickly and easily, and how to create it in V22.10 or in an older Version.
What is a support info file
For some support requests, our specialists need as much information as possible in order to to localize the problem precisely, and thus solve it faster. The support info file helps here: It contains all the data we need to understand the problem.
What are the benefits of a support info file
With a SIF, you can send all files to us with just one click. This way, our Professional Services team receives all the information they need. The following files are provided to us:
- Program settings (.INI)
- Printer definitions (.COS)
- Log files
- License number
- Selected jobs (.CJB)
- Profiles and linearizations used by the selected jobs
- Print data for selected jobs
- Printer related settings
Note: Before you create a support info file, you must create a web ticket. To learn how to create a web ticket, click here.
In some cases, you may be asked by our Professional Services team to configure an error diagnostic before creating a support info file. You will learn how to do this at the end of this blog article.
How to create a support info file
- Start the ColorGATE software.
- Optionally, you can select the job with which the problem occurred. You can also select multiple jobs or a container.
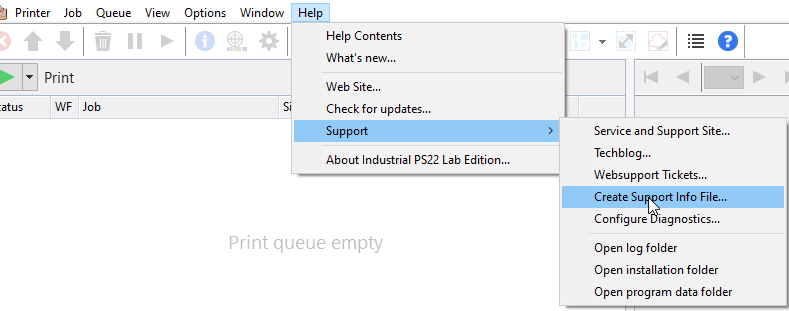
Note: When you select a job or container, the corresponding print data is integrated into the support info file. This has the benefit that our Professional Services team receives additional and more detailed information for troubleshooting. However, you also have the option to generate a SIF without first selecting a job. In this case, no job-specific data is transferred. - Click Help > Support > Create Support Info File....
The Create Support Info File dialog opens. - Enter your Web ticket number.
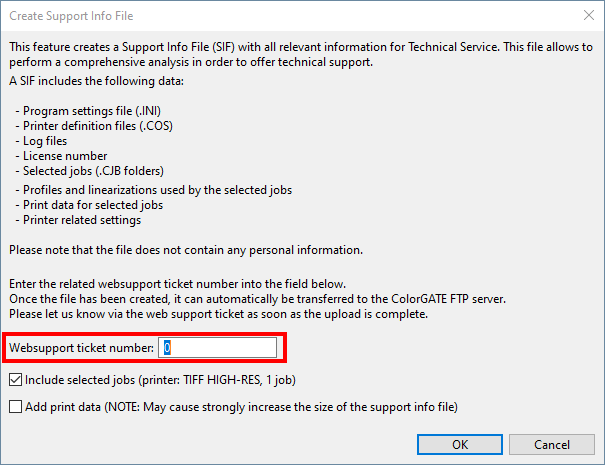
- If our Professional Services employee has asked you to include the print data in the SIF, please check the Add print data checkbox.
- Click OK to save the support info file in a specified folder, and then click Yes to upload it to the ColorGATE server.
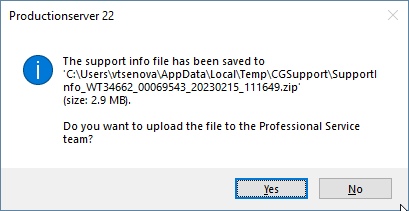
Once the upload process is complete, you will get a notification. You will also receive an email confirmation, that the support info file has been uploaded to Professional Services Team.
Note: Alternatively, you can save the SIF locally on your computer and upload it later or from another computer. The file in zip format is located at C:\Users\username\AppData\Local\Temp\CGSupport. To upload, open the appropriate web ticket in the ColorGATE web support area and click Upload support info file.
- Please let us know via the corresponding web ticket that you have created and uploaded a support info file.
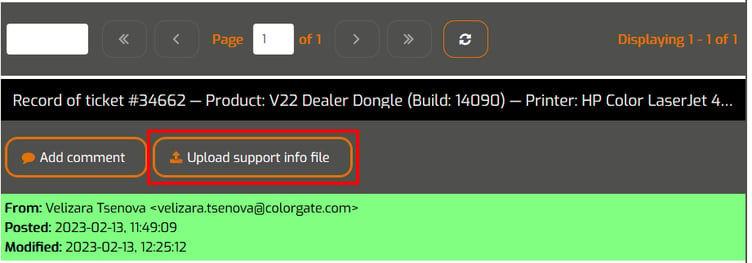
To do this, you can either manually switch to the web support area of our support site or click Yes in the dialog that appears after you have uploaded the SIF to be redirected directly to the web support area.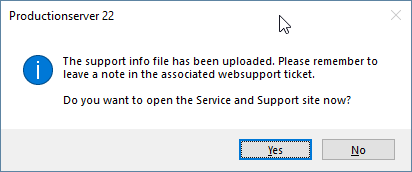
- In the web support area, open the appropriate web ticket and click Add comment in order to notify us of the uploaded SIF.
You have successfully created a support info file, uploaded it to our server, and notified us via the corresponding web ticket.
You can view the status of your ticket at any time in the web support area of our support site.
Configure error diagnostics
In some cases, you may be asked by our Professional Services team to enable an error diagnostics before creating a support info file. This increases the logging and thus facilitates and improves the ColorGATE support. In addition, it is possible to modify the tracing without restarting the system.
Note: Please activate the Configure Diagnostics function only when requested by a Professional Services employee as this may reduce the performance of your system. For regular operation, the function should be deactivated again.
To enable error diagnostics, perform the following steps:
- Click Help > Support > Configure Diagnostics.... The Configure Diagnostics dialog opens.
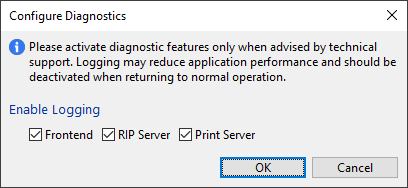
- Select which components of the program should be logged (Frontend, RIP Server, Print Server). The required components have been previously mentioned to you by our Professional Services employee.
- Click OK. Logging is started and the data of the selected components is integrated into the support info file created next.
We hope we could give you all information to create a support info file and to enable error diagnostics. If you have any questions about this, please contact us at contact@colorgate.com.
If you would like to create a web ticket, please click here.
0 Likes