

In the printing industry, the topic of "2.5D printing" has been under discussion for some time. Read on to find out what it's all about.
As the name suggests, 2.5D lies between conventional 2D printing on flat substrates on the one hand and 3D printing on the other. In 2.5D printing, height structures are added to the printed image. In fact, additional layers of ink are applied for this purpose, usually white ink or colorless varnish. This also makes the distinction from 3D printing clear: In 2.5D printing, existing pixels can be increased - more complex objects, such as the handle of a coffee cup, cannot be produced in this way.
The process of 2.5D printing
Some examples for application areas are:
- Reproduction of artwork, including surface texture and gloss
- Decorative printing with tactile texture for furniture and floor coverings
- Raised lettering, Braille, etc.
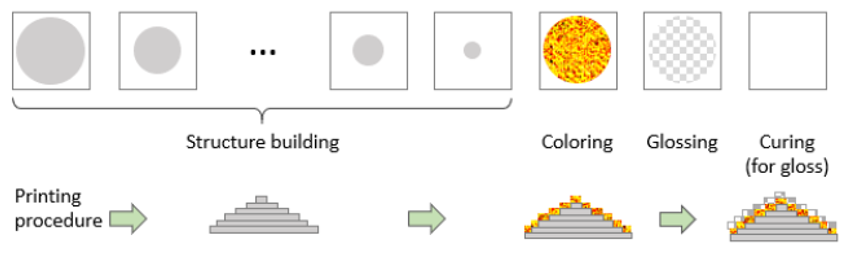
How to create a 2.5D print?
2.5D printing is particularly suitable for UV printing systems because here each ink layer can be cured by UV light before the next one is applied. This creates a very stable structure. However, there are also other technologies, for example based on pigment ink, in which several layers are applied and only dried at the end.
The layer thickness is 10 to a maximum of 70µm, depending on the printing system. The structure height depends on how far the distance between the print head and the substrate can be varied.
Additional color information can be printed onto the structure, depending on the area of application, in order to reproduce also the visual appearance.
The following steps are required for 2.5D printing:
- The image information and the surface structure of the motif are captured or created using a camera, scanner (e.g. the Metis Surf 3D) and image processing software, but also textures from texture libraries can be used.
- Three files are created: the image information (as a color file), the height information (e.g. as a grayscale bitmap), and optionally the gloss information.
- These bitmaps are saved as separate files or as RGB / CMYK plus spot colors.
- Processing is then configured in Productionserver.
- The image information and the surface structure are processed.
- The height structure of the motif/painting is generated using Slicing. That means: to create several layers of varnish or white ink, depending on the printing system used.
- The individual layers are applied by the printing system.
- The inscription, the base (basic structure with a certain number of layers) and the control wedge (optional) are printed on the substrate.
- The color image is printed on the created structure.
- Optionally, layers of varnish ink are applied to achieve gloss effects.
How ColorGATE Productionserver Supports 2.5 Technology
Since Version 22, ColorGATE Productionserver supports the basic technology for 2.5D printing including slicing and color management. In order to be able to control a specific printing system with the generated data, drivers adapted per printing system are necessary.
ColorGATE is currently in talks with further printer manufacturers about connecting their systems. As soon as more 2.5D drivers are available, ColorGATE will announce this.
For further information on 2.5D printing, please contact us at contact@colorgate.com.
0 Likes