

At ColorGATE, we are proud to be able to support digital printing systems from a wide range of manufacturers in our products, with over 1,700 drivers currently available. However, there are still cases where it is not possible to integrate a dedicated driver for a particular printer. For many lower-priced printers, the manufacturers do not intend for these to be controlled directly via RIP software; and given the large number of toner-based A4/A3 printers, it makes sense to offer only universal drivers for these in many cases. Fortunately, it is common for these kinds of printers to be controlled directly from Windows, so that you can print from any application. This is something we can take advantage of. This article explains how you can use our universal drivers to control printers without dedicated drivers in Productionserver or Proofgate.
Our universal drivers allow you to take advantage of the automation and color management benefits that our products offer, while retaining the wide array of settings available in the Windows drivers.
In this article, I will explain the three drivers Color Copier, Color Copier GDI and Windows Printer in more detail, providing one example for each driver. Please note that the drivers of course must be available in your license for you to be able to use them. It is possible to have them enabled on a trial basis. For more information, please contact us at contact@colorgate.com.
Windows Printer
With the “Windows Printer” driver, you can control basically any printer that is installed locally and listed under “Printers & Scanners” in Windows. For toner-based printers, however, we would rather recommend the Color Copier driver as it offers more customized features (more on this later).
In this example, we will use an Epson SC-P700. However, the general procedure is identical for other printers. First, of course, the appropriate Windows driver from Epson must be installed. You should also test immediately whether, for example, the test page from the Windows driver can be output successfully. If there should already be problems here, you will probably not have any more success in Productionserver or Proofgate…
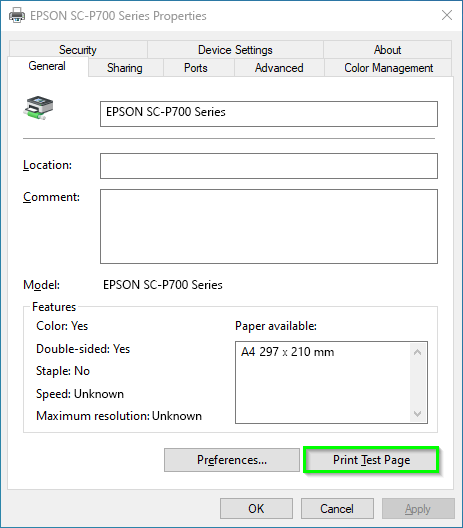
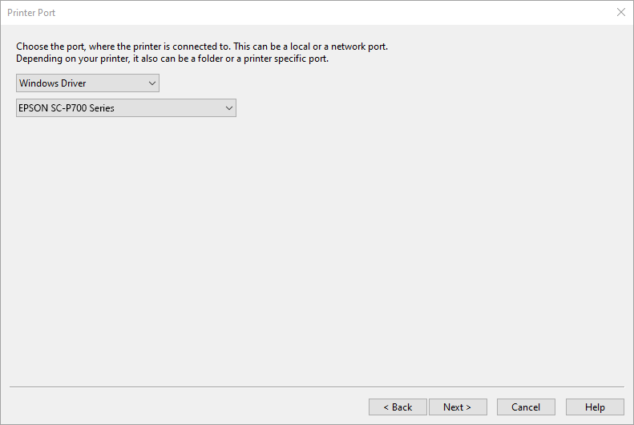
In our software, you must now launch the printer setup wizard (“Printer”->”New…”). There, select the manufacturer “***ColorGATE***” and then the “ColorGATE Windows Printer”. By clicking “Next >” twice, you will get to the “Printer port” step. Here, all installed local printers should be listed in the combo box below “Windows Driver”. Just select the printer you want to connect to. In this example I choose the Epson SC-P700.
Follow the wizard until you reach the “Advanced settings” step, then close it by clicking “Finish”. Now go to “Printer” -> “Properties” and select the “Hotfolder” step. Make sure that a hotfolder is selected.
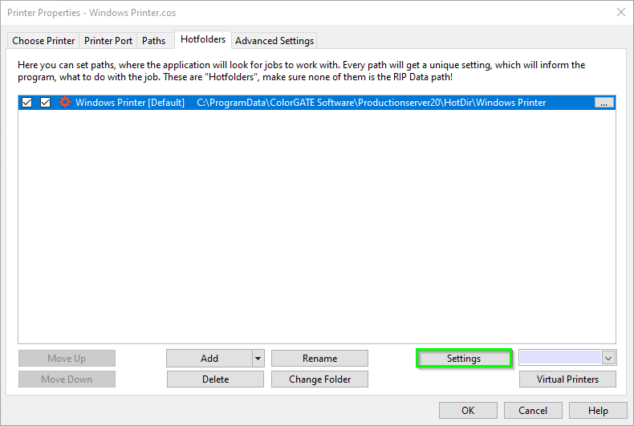
Click on “Settings” to open the settings of the hotfolder. There you can define default settings for jobs that are loaded into that hotfolder.
The media sizes that are available in Windows should have been imported to the “Media Sizes” dropdown menu in the “Printer” tab of the settings.
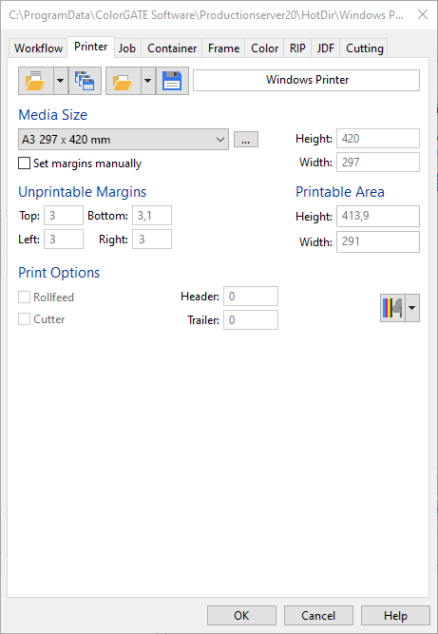
You can use the “…” menu to the right of the drop-down menu if you want to add custom media sizes.
The most important settings are made in the “Color” tab via the “Settings…” button.

Select the “Print Mode” tab.
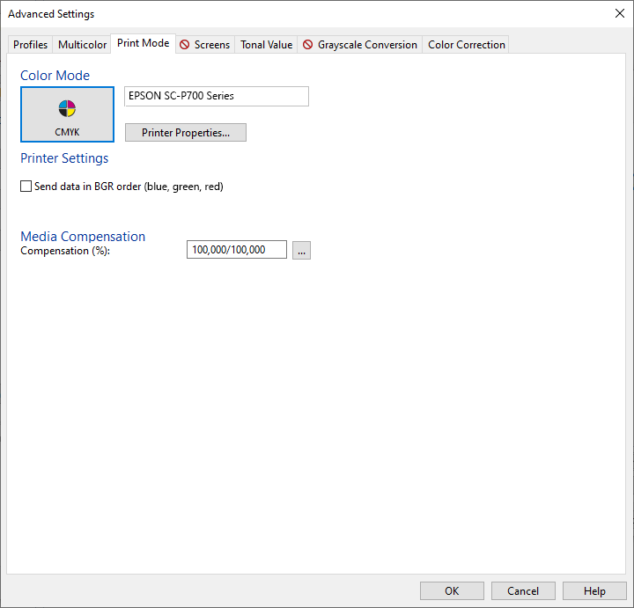
Here you see at first clearly less options than with “normal” drivers within our products, because most of them are hidden behind the “Printer Properties…” button. The checkbox “Send data in BGR order (blue, green, red)” can be useful if the color channels should be swapped during output. The available color modes are CMYK and RGB.
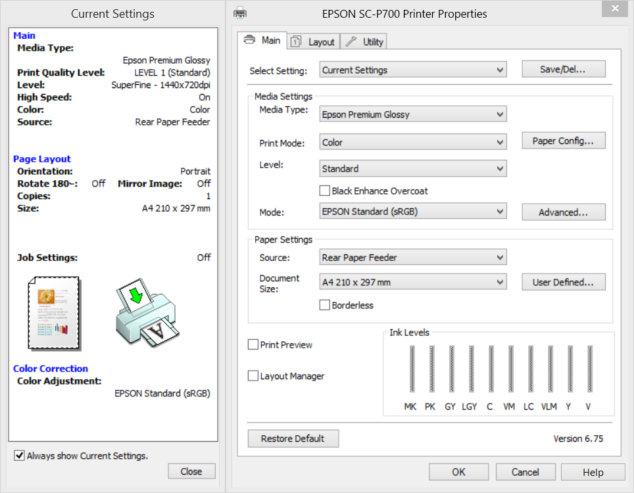
When you click the “Printer Properties…” button, the Windows driver dialog will open:
The media size should have been inherited from the settings in the “Printer” tab, although there may be printer drivers where you need to correct it manually.
Since the Productionserver should handle the color management, you should deactivate all settings related to this in the driver settings (in this case, select “Mode”->”Off (No Color Correction)”).
In this example, you use the “Medium”, “Color” and “Quality” settings to select the print mode, that is, which resolution and how many passes will be printed, as well as similar printer-specific settings. These dialogs and naming conventions might be completely different for other printers. Usually, the documentation of the manufacturer can help you out with further information.
When you exit the Windows driver dialog by clicking “OK”, the settings are saved. The settings can be managed via MIM combinations, just as when you are using “normal” dedicated printer drivers.
Keep in mind that using the manufacturer’s windows driver may cause problems, for example if the printer manufacturer implements major changes to the driver. In addition, uninstalling the Windows driver used will of course cause problems. If you want to use MIM combinations on more than one PC, you should also make sure to use the same version of the same Windows driver if possible.
Color Copier
The setup of the “Color Copier” driver is very similar to that of the “Windows Printer” driver. Therefore, I will only describe the differences here. The “Color Copier” driver requires that the device to be controlled has a PostScript driver. In the case of toner printers, it is often the case that both a “PCL” and a “PS” driver are offered by the manufacturer. For the “Color Copier” the PS driver is required.
In the following example I want to use an OKI Pro7411WT. Compared to the “Windows Printer” driver, the “Color Copier” driver offers additional functions in the “Printer” tab that are helpful for toner printers.
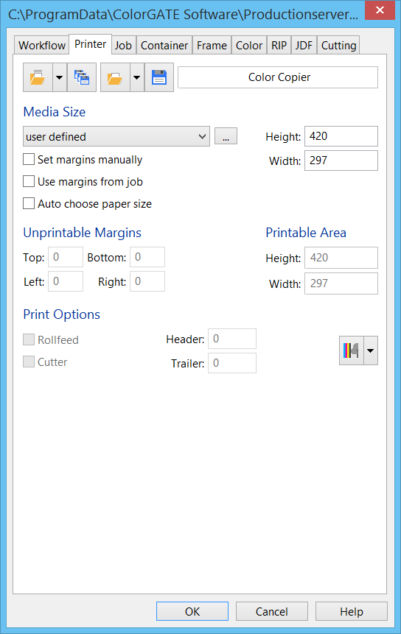
On the one hand, the margins of the job can be used and a paper size can be selected automatically. On the other hand, media can be hidden via the “…” button to make the list more manageable.
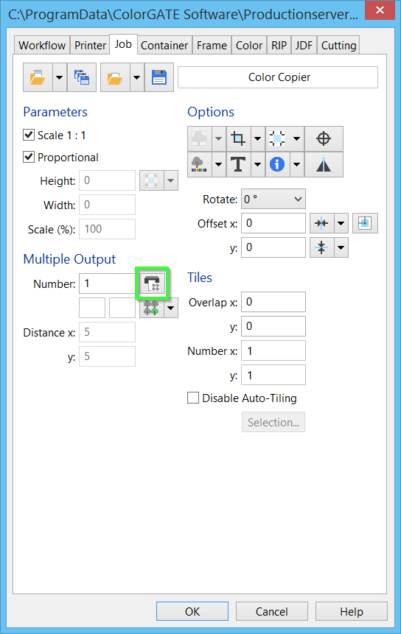
In the “Job” tab it is also possible to have the printer generate multiple output, i.e. instead of sending a page 10x to the printer, the printer is told to output the page 10x. This saves time when sending the print data and should also increase the processing speed at the printer.
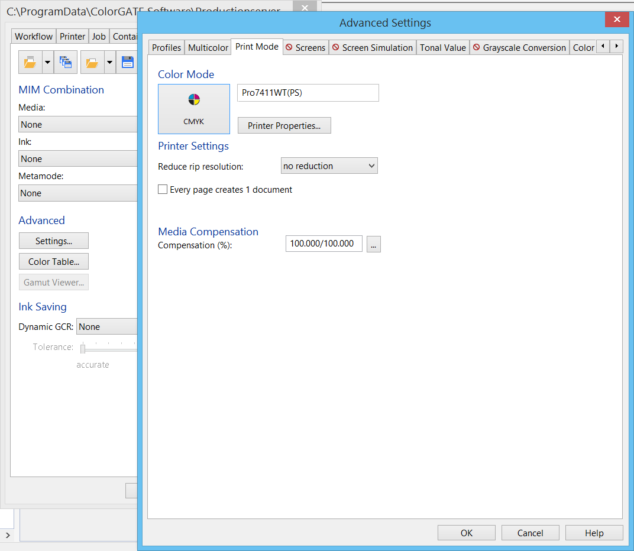
There are also two additional options in the “Print Mode” tab: First, you can reduce the RIP resolution to reduce the amount of data at the expense of quality, and second, there is the option to send each page as a single document. Only CMYK is available as the color mode here.
The “Printer Properties…” button brings you back to the printer driver dialog:
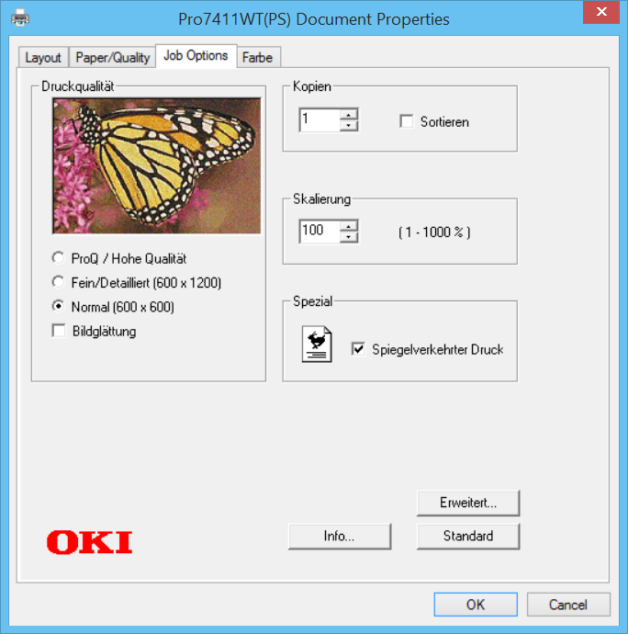
The handling here is very similar to the Windows Driver (i.e. the color management should be deactivated again as far as possible) and depends on the printer you are using.
Again, you can of course manage your settings via hotfolders and MIM combinations.
As with the Windows Printer, it is best not to replace the installed Windows driver if you are using the Color Copier, and it is recommended to check the settings after updates.
Color Copier GDI
The Color Copier GDI is a combination of the Windows Printer and the Color Copier. It does not need a Postscript driver, but offers the “Auto choose paper size” option and the option to hide media sizes in the “Printer” tab. Color modes available here are CMYK and RGB.
If you have the choice, you should always use dedicated printer drivers for your printers (see our list of Supported Devices), but the universal drivers described above are in many cases a good alternative for yet unsupported devices that allow you to still benefit from other features of our software.
For printers that do not have a Windows driver, but can be controlled via standard file formats like TIFF/PDF ( for example via another intermediary software) we will be provide another article in the future.
0 Likes